 Austria - EUR
 Belgium - EUR
 Bulgaria - EUR
 Cyprus - EUR
 Czech Republic - EUR
 Estonia - EUR
 Greece - EUR
 Hungary - EUR
 UK - GBP
 Ireland - EUR
 Latvia - EUR
 Lithuania - EUR
 Luxembourg - EUR
 Malta - EUR
 Netherlands - EUR
 Norway - NOK
 Portugal - EUR
 Romania - EUR
 Slovakia - EUR
 Slovenia - EUR
 Switzerland - EUR
How to replace battery on Automower 220AC or 230ACX
In this guide we will show you step-by-step how to change the battery of your Husqvarna Automower 220AC. The same procedure applies to Automower 230ACX.
We will change the battery through the keyboard to avoid de-assembling the upper body of your Automower.
How often do I have to change my battery?
Normally a genuine Husqvarna battery will last for 5-6 seasons. This also depends on how big your lawn is and how many hours per day that your Automower has to cut. An indication of when the battery needs to be changed is when your Automower returns to the charging base more frequently or when it suddenly stops in the middle of the lawn with an error message 'Empty battery'.
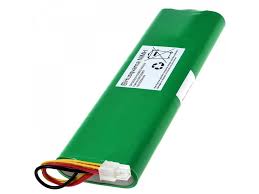
On the bottom of this page you will find the correct OEM spare parts that we use for this replacement.
.jpg) Step 1: Turn your Automower upside-down and disconnect the charging contacts. Step 1: Turn your Automower upside-down and disconnect the charging contacts. | .jpg) Step 2: Remove the screws holding the chassis. It is fastened in a total of four screws as shown in the image. Step 2: Remove the screws holding the chassis. It is fastened in a total of four screws as shown in the image. |
.jpg) Step 3: Remove the clips that holds the micro switch. Then lift off the chassis from the Automowers body. Be careful to not loose the two washers that lies on top of the lift sensors. | .jpg) Step 4: Remove the four screws holding the keyboard. Then lift off the keyboard and also remove the seal. |
.jpg) Step 5: From here we can see the battery in the Automower. Disconnect the battery contact marked in the yellow ring. | .jpg) Step 6: Use a long Torx T20 screwdriver to unscrew the two battery holders. |
.jpg) Step 7: Remove the battery holders and take out the old battery. | .jpg) Step 8: Install the new battery and attach the battery holders, then screw them into place. Also connect the battery cable into the motherboard. Don't forget to place a new seal before reassembling the keyboard. |
Step 9: Tighten the four screws around the keyboard. | .jpg) Step 9: Reinstall the chassis on top of the body and make sure to bring through the micro switch and attach the holding clip. Also make sure that the washers are in place on top of the lift sensors as shown in the image. |
.jpg) Step 10: Finally tighten the four screws on the top of the chassis and connect the charging contact under the Automower. |
After you've done this procedure make sure to charge the battery fully before letting your Automower go back to work.
Spare parts used
How to replace battery on Automower 220AC or 230ACX
In this guide we will show you step-by-step how to change the battery of your Husqvarna Automower 220AC. The same procedure applies to Automower 230ACX.
We will change the battery through the keyboard to avoid de-assembling the upper body of your Automower.
How often do I have to change my battery?
Normally a genuine Husqvarna battery will last for 5-6 seasons. This also depends on how big your lawn is and how many hours per day that your Automower has to cut. An indication of when the battery needs to be changed is when your Automower returns to the charging base more frequently or when it suddenly stops in the middle of the lawn with an error message 'Empty battery'.
On the bottom of this page you will find the correct OEM spare parts that we use for this replacement.
Required tools: Torx screwdriver T20 and allen key size 4.
| Step 1: Turn your Automower upside-down and disconnect the charging contacts. |
| Step 2: Remove the screws holding the chassis. It is fastened in a total of four screws as shown in the image. |
Step 3: Remove the clips that holds the micro switch. Then lift off the chassis from the Automowers body. Be careful to not loose the two washers that lies on top of the lift sensors. |
Step 4: Remove the four screws holding the keyboard. Then lift off the keyboard and also remove the seal. |
Step 5: From here we can see the battery in the Automower. Disconnect the battery contact marked in the yellow ring. |
Step 6: Use a long Torx T20 screwdriver to unscrew the two battery holders. |
Step 7: Remove the battery holders and take out the old battery. |
Step 8: Install the new battery and attach the battery holders, then screw them into place. Also connect the battery cable into the motherboard. Don't forget to place a new seal before reassembling the keyboard. |
Step 9: Tighten the four screws around the keyboard. |
Step 9: Reinstall the chassis on top of the body and make sure to bring through the micro switch and attach the holding clip. Also make sure that the washers are in place on top of the lift sensors as shown in the image. |
Step 10:Finally tighten the four screws on the top of the chassis and connect the charging contact under the Automower. |
After you've done this procedure make sure to charge the battery fully before letting your Automower go back to work.
Spare parts used
 Help center is a digital DIY manual for Husqvarna Automower robotic lawnmower. We teach you how to change batteries, circuitboards and other spare parts on your Husqvarna Automower.