 Austria - EUR
 Belgium - EUR
 Bulgaria - EUR
 Cyprus - EUR
 Czech Republic - EUR
 Estonia - EUR
 Greece - EUR
 Hungary - EUR
 UK - GBP
 Ireland - EUR
 Latvia - EUR
 Lithuania - EUR
 Luxembourg - EUR
 Malta - EUR
 Netherlands - EUR
 Norway - NOK
 Portugal - EUR
 Romania - EUR
 Slovakia - EUR
 Slovenia - EUR
 Switzerland - EUR
Replacing the wheel motor on the Husqvarna Automower 220AC/230ACX
Here is a step by step guide on how to disassemble and replace the wheel motor of the Husqvarna Automower 220AC. The same steps apply for the 230ACX. In many cases, a failing wheel motor can result in the error code "Wheel motor blocked" or the robot moving in circles if it is only running on one motor. Before replacing the wheel motor, make sure that the motor is really the problem and that the motherboard is not damaged. For example, if you get the error code "Right wheel motor blocked", you can swap the right wheel motor to the left side (and vice versa). If the error is still present on the right side, it is most likely that the motherboard is defective and the error will not be fixed by replacing the wheel motor.
Are there different wheel motors?
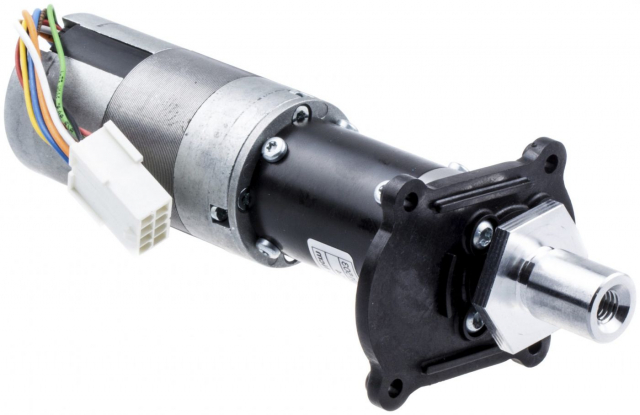
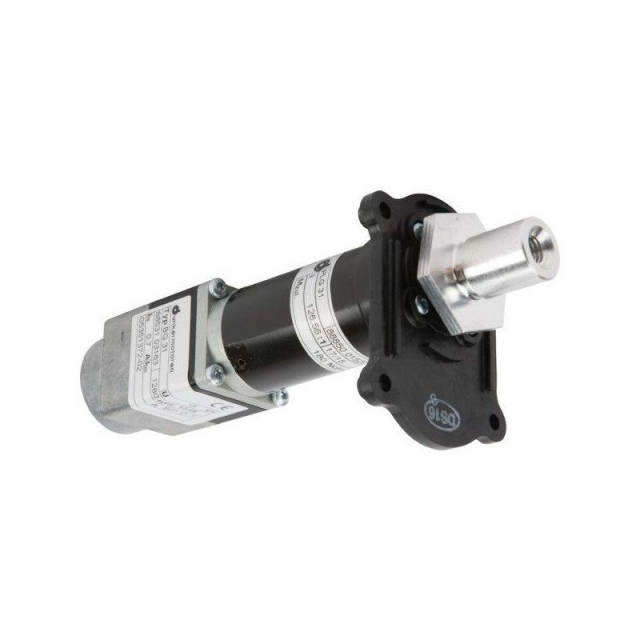
Yes, the 220AC was sold with two different wheel motors. An easy way to tell them apart is to look at the plastic holder that the wheel motor screws into. It is available in white or black.
If you have a white holder, you should have a Linix wheel motor. If it is a black holder, you should have a Dunker wheel motor. For the 230ACX, 260ACX and 265ACX it was the same motor in all of the models.
Replacing the wheel motor is a simple operation and requires no special tools. Below is our step by step guide on how to go about it.
At the bottom of the page there is a list of the spare parts needed for the job.
Tools you will need: Torx screwdriver T20, Allen key size 5 and a small flat chisel.
.jpg) Step 1: Set your Automower vertically. Remove the marked paste plug using a flat chisel or other small object. Step 1: Set your Automower vertically. Remove the marked paste plug using a flat chisel or other small object. | .jpg) Step 2: Set your Automower vertically. Remove the marked paste plug using a flat chisel or other small object. Step 2: Set your Automower vertically. Remove the marked paste plug using a flat chisel or other small object. |
.jpg) Step 3: Remove the wheel and hubcap from the robot's axis. Unscrew the four marked screws holding the wheel motor. | .jpg) Step 4: Carefully lift the wheel motor and unplug it. |
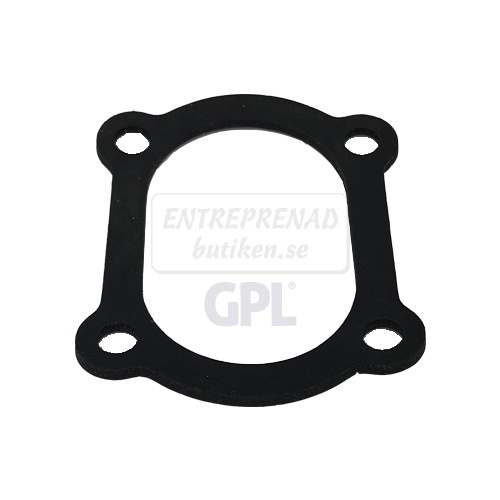
.jpg) Step 5: Take out the new wheel motor and fit the gasket (sold separately) | .jpg) Step 6: Insert the new drive motor. |
.jpg) Step 7: Screw on the wheel motor with its four screws. | .jpg) Step 8: Now replace the drive wheel, the hub cap and finally the small plastic plug that covers the screw. |
Once the drive motor has been replaced, the robotic lawnmower can simply be started up as usual.
Spare parts used (depending on model)
Replacing the wheel motor on the Husqvarna Automower 220AC/230ACX
Here is a step by step guide on how to disassemble and replace the wheel motor of the Husqvarna Automower 220AC. The same steps apply for the 230ACX. In many cases, a failing wheel motor can result in the error code "Wheel motor blocked" or the robot moving in circles if it is only running on one motor. Before replacing the wheel motor, make sure that the motor is really the problem and that the motherboard is not damaged. For example, if you get the error code "Right wheel motor blocked", you can swap the right wheel motor to the left side (and vice versa). If the error is still present on the right side, it is most likely that the motherboard is defective and the error will not be fixed by replacing the wheel motor.
Are there different wheel motors?
Yes, the 220AC was sold with two different wheel motors. An easy way to tell them apart is to look at the plastic holder that the wheel motor screws into. It is available in white or black.
If you have a white holder, you should have a Linix wheel motor. If it is a black holder, you should have a Dunker wheel motor. For the 230ACX, 260ACX and 265ACX it was the same motor in all of the models.
Replacing the wheel motor is a simple operation and requires no special tools. Below is our step by step guide on how to go about it.
At the bottom of the page there is a list of the spare parts needed for the job.
Tools you will need: Torx screwdriver T20, Allen key size 5 and a small flat chisel.
| Steg 1: Set your Automower vertically. Remove the marked paste plug using a flat chisel or other small object. |
| Steg 2: Use a size 5 Allen wrench to loosen the screw holding the wheel. |
Steg 3: Remove the wheel and hubcap from the robot's axis. Unscrew the four marked screws holding the wheel motor. |
Steg 4: Carefully lift the wheel motor and unplug it. |
Steg 5: Take out the new wheel motor and fit the gasket (sold separately) |
Steg 6: Insert the new drive motor. |
Steg 7: Screw on the wheel motor with its four screws. |
Steg 8: Now replace the drive wheel, the hub cap and finally the small plastic plug that covers the screw. |
Once the drive motor has been replaced, the robotic lawnmower can simply be started up as usual.
Spare parts used (depending on model)
 Help center is a digital DIY manual for Husqvarna Automower robotic lawnmower. We teach you how to change batteries, circuitboards and other spare parts on your Husqvarna Automower.