 Austria - EUR
 Belgium - EUR
 Bulgaria - EUR
 Cyprus - EUR
 Czech Republic - EUR
 Estonia - EUR
 Greece - EUR
 Hungary - EUR
 UK - GBP
 Ireland - EUR
 Latvia - EUR
 Lithuania - EUR
 Luxembourg - EUR
 Malta - EUR
 Netherlands - EUR
 Norway - NOK
 Portugal - EUR
 Romania - EUR
 Slovakia - EUR
 Slovenia - EUR
 Switzerland - EUR
Change the circuit board for the charging station on the Husqvarna Automower 220AC / 230ACX
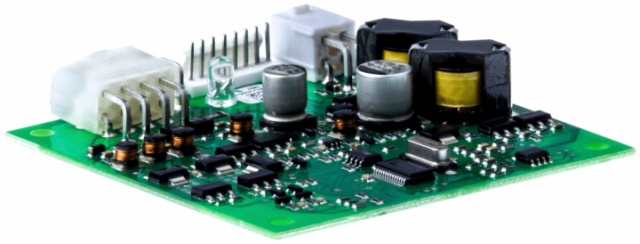
The circuit board in the charging station controls the signal to the robotic lawnmower. It is easily affected by lightning due to the loop located in the lawn acting as an antenna. If lightning strikes nearby, a surge can occur via the loop into the charging station and the first thing it encounters is the circuit board. If overvoltage occurs, the circuit board can be damaged and completely or partially stop working.The error message the robotic lawnmower usually displays if the circuit board is defective is "no loop signal". Then check the colour of the light in the charging station. A green light indicates that the loop is undamaged and the circuit board is working. However, if the lightning has affected the circuit board, this may be a false signal. Start by pulling out one of the boundary wires to see if the light starts flashing green, which it should if the circuit board is intact. If the light is still green and unblinking, even after you have pulled out a boundary wire, this is a sign that the circuit board is faulty.
If the lamp still flashes green even though the boundary wires are connected correctly, it may be because 1. the circuit board is defective or 2. the wire is defective. You should measure the resistance of the loop to check if it is intact or faulty. A value below 20 Ohms is a sign that the loop is intact (the value should be as low as possible, but anything below 20 Ohms indicates a working loop). If the value exceeds 20 Ohms, the loop should be checked and repaired.
Here is a step by step guide of how to disassemble and replace the circuit board on the Husqvarna Automower 220AC. The same principle applies for both 230ACX and lots of other models.
Changing the circuit board in the charging station is a simple operation and requires no special tools.
See below for step by step instructions.
At the bottom of the page there is a list of the spare parts needed to do the job.
Tools used: Torx screwdriver T20.
Remember to also use anti-static (ESD) wristbands when working with circuit boards to avoid the risk of damage.
.jpg) Step 1: Detach the top cover from the charger tower. It fastens with the marked snap fastener. These are bent outwards to release the cover. The same type of fasteners are also on the other side. Step 1: Detach the top cover from the charger tower. It fastens with the marked snap fastener. These are bent outwards to release the cover. The same type of fasteners are also on the other side. | .jpg) Step 2: There are two torx screws on the front of the charging station tower. Loosen these and then set the cover aside. Step 2: There are two torx screws on the front of the charging station tower. Loosen these and then set the cover aside. |
.jpg) Step 3: Now you can see the circuit board with two connectors connected. Unscrew these and also unscrew the two marked screws. | .jpg) Step 4: Now carefully lift the circuit board out of its holder. |
.jpg) Step 5: Now carefully lift the circuit board out of its holder. | .jpg) Step 6: Replace and screw the front on. Then put the top cover back on. |
.jpg) Step 7: Finally, you need to pair the robotic lawnmower with the new circuit board. On Automower 220AC, 230ACX etc. you pair them by changing the pin code (you can change it to the same as before). Then the robot will confirm the new loop signal and work properly again. |
Change the circuit board for the charging station on the Husqvarna Automower 220AC / 230ACX
The circuit board in the charging station controls the signal to the robotic lawnmower. It is easily affected by lightning due to the loop located in the lawn acting as an antenna. If lightning strikes nearby, a surge can occur via the loop into the charging station and the first thing it encounters is the circuit board. If overvoltage occurs, the circuit board can be damaged and completely or partially stop working.The error message the robotic lawnmower usually displays if the circuit board is defective is "no loop signal". Then check the colour of the light in the charging station. A green light indicates that the loop is undamaged and the circuit board is working. However, if the lightning has affected the circuit board, this may be a false signal. Start by pulling out one of the boundary wires to see if the light starts flashing green, which it should if the circuit board is intact. If the light is still green and unblinking, even after you have pulled out a boundary wire, this is a sign that the circuit board is faulty.
If the lamp still flashes green even though the boundary wires are connected correctly, it may be because 1. the circuit board is defective or 2. the wire is defective. You should measure the resistance of the loop to check if it is intact or faulty. A value below 20 Ohms is a sign that the loop is intact (the value should be as low as possible, but anything below 20 Ohms indicates a working loop). If the value exceeds 20 Ohms, the loop should be checked and repaired.
Here is a step by step guide of how to disassemble and replace the circuit board on the Husqvarna Automower 220AC. The same principle applies for both 230ACX and lots of other models.
Changing the circuit board in the charging station is a simple operation and requires no special tools.
See below for step by step instructions.
At the bottom of the page there is a list of the spare parts needed to do the job.
Tools used: Torx screwdriver T20.
Remember to also use anti-static (ESD) wristbands when working with circuit boards to avoid the risk of damage.
| Step 1: Detach the top cover from the charger tower. It fastens with the marked snap fastener. These are bent outwards to release the cover. The same type of fasteners are also on the other side. |
| Step 2: There are two torx screws on the front of the charging station tower. Loosen these and then set the cover aside. |
Step 3: Now you can see the circuit board with two connectors connected. Unscrew these and also unscrew the two marked screws. |
Step 4: Now carefully lift the circuit board out of its holder. |
Step 5: Remove the new circuit board and install in reverse order. Screw it in first and then connect it. |
Step 6: Replace and screw the front on. Then put the top cover back on. |
Step 7: Finally, you need to pair the robotic lawnmower with the new circuit board. On Automower 220AC, 230ACX etc. you pair them by changing the pin code (you can change it to the same as before). Then the robot will confirm the new loop signal and work properly again. |
Spare parts used
 Help center is a digital DIY manual for Husqvarna Automower robotic lawnmower. We teach you how to change batteries, circuitboards and other spare parts on your Husqvarna Automower.