 Austria - EUR
 Belgium - EUR
 Bulgaria - EUR
 Cyprus - EUR
 Czech Republic - EUR
 Estonia - EUR
 Greece - EUR
 Hungary - EUR
 UK - GBP
 Ireland - EUR
 Latvia - EUR
 Lithuania - EUR
 Luxembourg - EUR
 Malta - EUR
 Netherlands - EUR
 Norway - NOK
 Portugal - EUR
 Romania - EUR
 Slovakia - EUR
 Slovenia - EUR
 Switzerland - EUR
Change the keyboard on the Husqvarna Automower 220AC / 230ACX
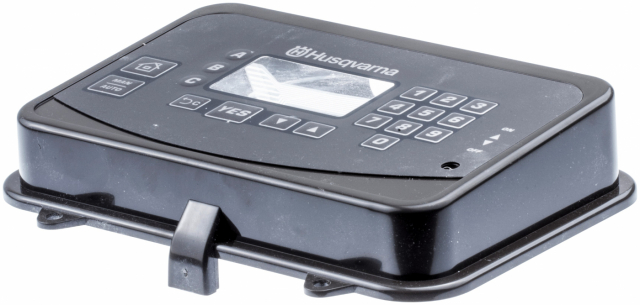
Here is a step by step guide of how to disassemble and replace the keyboard on the Husqvarna Automower 220AC and 230ACX. The same principle applies for the 230ACX. A defective keyboard can often generate the error code "Time to enter pin", and only show lines like this " _ _ _ _ " when it prompts you to enter your pin code. Or that the robot doesn't react to all your keyboard commands. Sometimes it reacts to a few keys, or none at all.
Changing the display cover/keyboard is a simple operation and requires no special tools. See below for step by step instructions.
At the bottom of the page there is a list of the spare parts needed to do the job.
.jpg) Step 1: Turn your Automower over and disconnect the power cable. First remove the rubber cap; then disassemble the charging connector. Step 1: Turn your Automower over and disconnect the power cable. First remove the rubber cap; then disassemble the charging connector. | .jpg) Step 2: Loosen the screws of the chassis. On Automower 220AC and 230ACX the chassis is secured with four screws in total. Two at the rear end and two under the hatch for the height of cut adjustment. Step 2: Loosen the screws of the chassis. On Automower 220AC and 230ACX the chassis is secured with four screws in total. Two at the rear end and two under the hatch for the height of cut adjustment. |
.jpg) Step 3: Remove the clip that holds the microswitch. Lift the chassis off the robot. Please note! Make sure you don't lose the lock washers located on top of the two lift sensors at the front of the robot. | .jpg) Step 4: Unscrew the four screws that hold the display cover. Lift off the display cover and remove the sealing strip. |
.jpg) Step 5: Disconnect the display at its four points. Next, unscrew the holder that holds the display circuit board in place. Lift out the motherboard. | .jpg) Step 6: Remove the rubber plug to the micro switch from the display cover. |
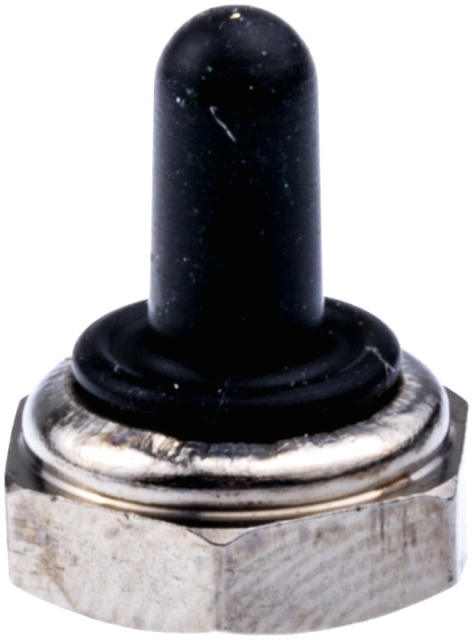
.jpg) Step 7: Turn the display cover over. Use a PolyGrip® or pliers to unscrew the rubber cap protecting the on/off switch. Check the rubber cap for damage. If it is cracked, it should be replaced with a new one to minimise the risk of water damage. | .jpg) Step 8: Remove the new display cover and reassemble the on/off switch, display circuit board and the connections. Don't forget to add new sealing strips for the chassis and the blade motor. |
.jpg) Step 9: You can put the chassis back now. Insert the microswitch through the hole and reattach it using the clamp. Make sure you replace the lock washers on the respective lift sensors; otherwise there is a risk that the lift sensors will turn and generate the error message "mower lifted". The image shows the spiked lock washers. | .jpg) Step 10: After the chassis is assembled and screwed on, turn the mower over and replace the charging plug, making sure the rubber plug is securely in place. |
You don't need to programme or assemble anything after replacing the keyboard/display cover. Just use your Automower as usual.
Change the keyboard on the Husqvarna Automower 220AC / 230ACX
Here is a step by step guide of how to disassemble and replace the keyboard on the Husqvarna Automower 220AC and 230ACX. The same principle applies for the 230ACX. A defective keyboard can often generate the error code "Time to enter pin", and only show lines like this " _ _ _ _ " when it prompts you to enter your pin code. Or that the robot doesn't react to all your keyboard commands. Sometimes it reacts to a few keys, or none at all.
Changing the display cover/keyboard is a simple operation and requires no special tools. See below for step by step instructions.
At the bottom of the page there is a list of the spare parts needed to do the job.
| Step 1: Turn your Automower over and disconnect the power cable. First remove the rubber cap; then disassemble the charging connector. |
| Step 2: Loosen the screws of the chassis. On Automower 220AC and 230ACX the chassis is secured with four screws in total. Two at the rear end and two under the hatch for the height of cut adjustment. |
Step 3: Remove the clip that holds the microswitch. Lift the chassis off the robot. Please note! Make sure you don't lose the lock washers located on top of the two lift sensors at the front of the robot. |
Step 4: Unscrew the four screws that hold the display cover. Lift off the display cover and remove the sealing strip. |
Step 5: Unscrew the four screws that hold the display cover. Lift off the display cover and remove the sealing strip. |
Step 6: Remove the rubber plug to the micro switch from the display cover. |
Step 7: Turn the display cover over. Use a PolyGrip® or pliers to unscrew the rubber cap protecting the on/off switch. Check the rubber cap for damage. If it is cracked, it should be replaced with a new one to minimise the risk of water damage. |
Step 8: Remove the new display cover and reassemble the on/off switch, display circuit board and the connections. Don't forget to add new sealing strips for the chassis and the blade motor. |
Step 9: You can put the chassis back now. Insert the microswitch through the hole and reattach it using the clamp. Make sure you replace the lock washers on the respective lift sensors; otherwise there is a risk that the lift sensors will turn and generate the error message "mower lifted". The image shows the spiked lock washers. |
Step 10: EAfter the chassis is assembled and screwed on, turn the mower over and replace the charging plug, making sure the rubber plug is securely in place. |
After the chassis is assembled and screwed on, turn the mower over and replace the charging plug, making sure the rubber plug is securely in place!
Spare parts used
 Help center is a digital DIY manual for Husqvarna Automower robotic lawnmower. We teach you how to change batteries, circuitboards and other spare parts on your Husqvarna Automower.