 Austria - EUR
 Belgium - EUR
 Bulgaria - EUR
 Cyprus - EUR
 Czech Republic - EUR
 Estonia - EUR
 Greece - EUR
 Hungary - EUR
 UK - GBP
 Ireland - EUR
 Latvia - EUR
 Lithuania - EUR
 Luxembourg - EUR
 Malta - EUR
 Netherlands - EUR
 Norway - NOK
 Portugal - EUR
 Romania - EUR
 Slovakia - EUR
 Slovenia - EUR
 Switzerland - EUR
Troubleshooting the boundary cable or guide cable due to cable break
It happens that the loop (boundary cable, guide cable) breaks for your robotic lawnmower. For a Husqvarna Automower, this means that the charging station indicates a colour other than a steady green, and a stationary robot with the error message 'No loop signal'.We often get questions about what to do about a cable break, as well as what affects it. That's why we thought it would be useful to share some tips, thoughts, and considerations if the problem occurs.
First and foremost - Check the charging station's diode
If the error message 'no loop signal' occurs, always start by checking what the charging station's diode is indicating. The diode is located in the middle of the charging station and either blinks blue* or green* depending on which model you have.*Blue blinking applies to Automower 105, 305, 308, 310, 315, 315X, 405X, 415X, 420, 430X, 440 & 450X.
*Green blinking applies to Automower G2, 220AC, 230ACX, Solar Hybrid, 260ACX & 265ACX.
The charging station should always indicate some colour. If the charging station's diode does not light up at all, it means the charging station is not receiving power (assuming the diode on the circuit board is intact), or the fault lies in the charging station's circuit board. In cases where the charging station's diode does not light up, the loop should not be suspected.
Start troubleshooting at the right end - Measure the loop's resistance
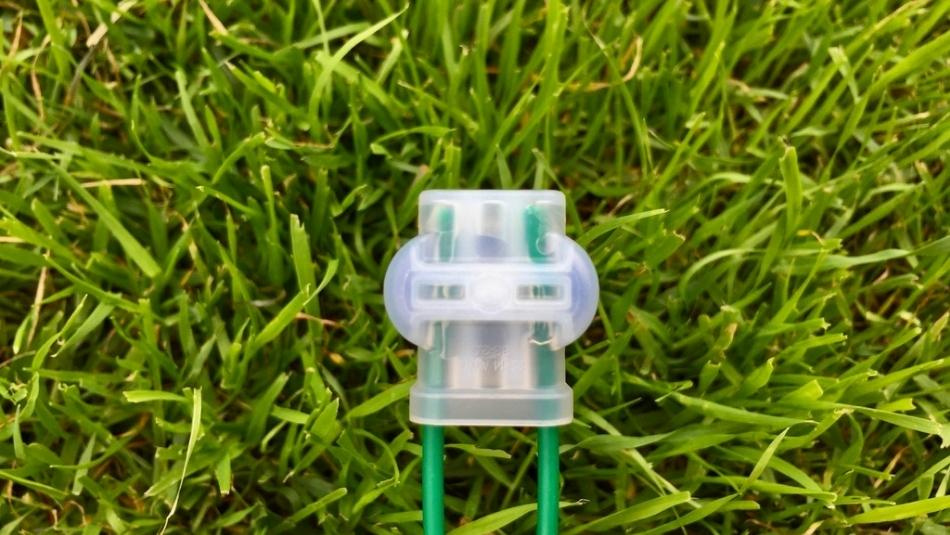
It is important to ensure that there is indeed a cable break before looking for faults in your loop. The charging station's diode could be showing an error, and it could be as simple as the connection connectors attached to the charging station's pins for each cable having oxidised.The best way to ensure a cable break is by resistance measuring (i.e., measuring the resistance, continuity testing) the loop with a multimeter. Connect the multimeter's probes to the right and left loop through the connection connector and make sure to contact the metal pin inside the connector. Make sure the multimeter is set to resistance measurement (marked with the Ohm symbol (Ω)). Check the value you get when measuring. In the image below, we perform a measurement on a loop that has 0 Ohm, i.e., the cable is intact.
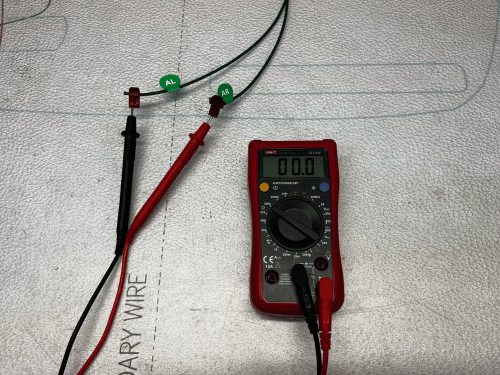
If your multimeter shows a value exceeding 25 Ohm (Ω), it indicates damage to the loop. A value of a few hundred Ohms is a very small damage, while if you get a value in the thousands or hundreds of thousands of Ohms, the damage is greater. You want to have as low an Ohm value as possible.
If you get an infinite reading, there is definitely a complete break, meaning the loop is entirely cut and should be easy to locate. With some luck and a thorough visual check, you might find it without a cable locator.
It's not uncommon for a cable break to be a damaged cable rather than a complete cut. With some cable testers, you may get a signal around the entire loop but not strong enough for the Automower to operate. By measuring the resistance of the loop, you always get a clear indication of whether there is a fault or not.
Confirmed Cable Break - Determine which side the fault lies on
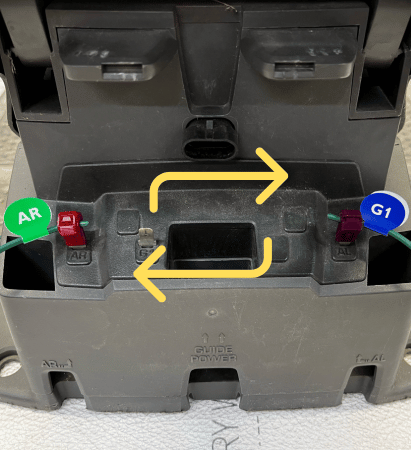
If your charging station is blinking and indicates a cable break, and you have confirmed through a resistance measurement that the loop is damaged, you can usually identify which side of the boundary cable the fault is on. This is possible as long as you have one or more guide cables.What you do is place any guide cable on a pin for the boundary cable. This way, you 'trick' the charging station into thinking the guide cable is a boundary cable. For example, try putting guide cable 1 on the AR (right boundary cable) pin. Then we are tricking the charging station into thinking the guide cable is the right boundary cable. Does the charging station then show a green light? If yes, then we know that the right boundary cable is the problem and that's the one to inspect.
You can do the same thing by switching out AL (left boundary cable) and seeing if the fault is there instead. See the picture below.
If it turns out that you don't get a steady green light no matter how you connect the cables, it's likely that the guide cable also has a break. However, to be certain, always measure the resistance in the loop before drawing any conclusions.
If the charging station indicates a cable break even though the resistance value is OK
It can happen that the charging station indicates a cable break even though you have performed a resistance measurement and the values are good. In this case, it is most likely due to a defect in the charging station's circuit board.Troubleshooting Cable Breaks and Choosing a Cable Locator
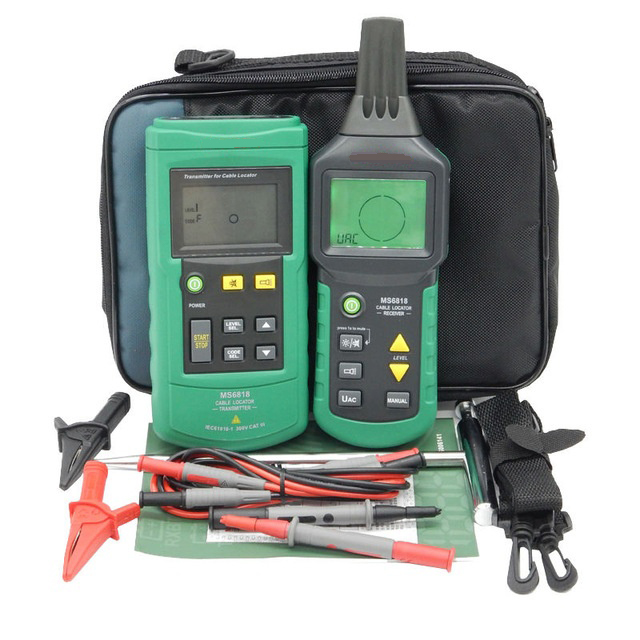
There are different types of cable locators and tools that can be used to locate cable breaks. Some use an AM radio that picks up the signal from the loop and emits a sound as long as there is power. Others use an electric fence energiser that sends pulses of electricity through the loop to listen for where the break or damage is located.We advocate using a cable locator of the model MS6818. The advantage of the MS6818 over smaller cable locators or an AM radio is that it measures the current signal very precisely. You can see the current signal strength right where you are, which allows you to locate even the smallest damages on a loop.
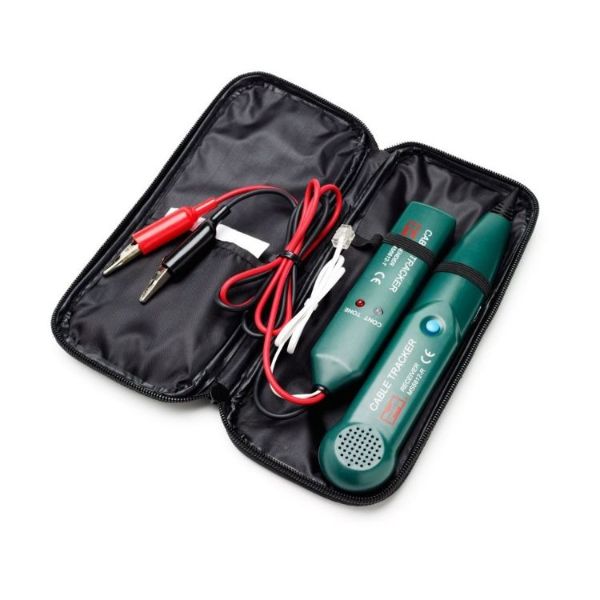
Another popular model is called MS6812 and works very well if the loop is completely broken. It picks up the signal from the loop like an AM radio. However, it becomes difficult to use if it's a damage rather than a complete break, as there still can be current through the cable, but not enough for the Automower to operate.
Common to both MS6818 and MS6812 is that you receive a transmitter and a receiver. The transmitter is connected with a red alligator clip to the loop being troubleshooted and the black to the ground. Then you use the receiver to follow the loop and receive confirmation that the loop has a signal through an audio signal and also through the display on the MS6818. Where the signal breaks or is lost, there is damage or a break in the cable.
Purchase cable locator
 Help center is a digital DIY manual for Husqvarna Automower robotic lawnmower. We teach you how to change batteries, circuitboards and other spare parts on your Husqvarna Automower.